Marcin Balcerzak / shutterstock.com
The past 20 years have seen dramatic changes in the practice of rheumatology, ranging from bench to bedside therapeutic advances to dramatic improvements in diagnostic imaging. The results have been gratifying for our patients and attractive to internal medicine trainees making subspecialty career decisions. We are pleased to provide this article for The Rheumatologist’s wide-ranging readership, from expert sonographers to those of you who regard the best use of one of these machines as a doorstop for your procedure room.
Consistent with our teaching techniques, our comments range from mostly serious to the occasionally humorous, even though we (well, at least one of us anyway) may occasionally sink to the level of a bad dad joke.
Over the past decade, more than 400 rheumatology fellows and faculty members have incorporated ultrasound use into their practice under the guidance of our group, whose diabolical methods include an eight-month blended learning program that includes remote learning, a hands-on workshop and an in-person written and practical examination at the end.1 Thanks to the proliferation of practicing rheumatologists versed in ultrasound, many rheumatology fellows are now being mentored in ultrasound imaging by their local faculty as part of their fellowship training.2 Other rheumatologists learn ultrasound through a combination of weekend workshops and self-study, but without the benefit of ongoing feedback.
After the conclusion of our most recent, sweat-filled, grueling examination, the course faculty reviewed some of the most common predicaments our students experienced to guide teaching modifications for the following year. We summarize these pitfalls now with the hope it will be of use to providers learning rheumatologic ultrasound (RhUS), as well those of you who remain uncertain about its relevance. The discussion is subdivided by joint region, so the discussion does not become disjointed (pun with apologies from Paul DeMarco [PD]).
General Comments
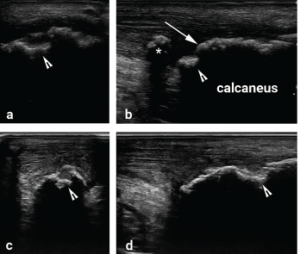
Figure 1
Images a and b were obtained from the posterior heel by one student and c and d by another student from the same model patient on the same day. The erosion is much better defined on both longitudinal and transverse views in c and d, while it is harder to distinguish erosion from osteophyte on images a and b. An erosion (arrowhead) is noted on all views. A normal calcaneal surface (arrow) that could be mistaken for an osteophyte if the erosion next to it were not recognized as an erosion. On image b, there is tendon calcification (asterisk) that is not demonstrated in the other views. These images show the importance of sweeping the transducer through the entire width of the target structure to avoid missing pathology, and the need to correlate longitudinal and transverse images to define abnormalities.
When performing a RhUS examination, it’s critical to sweep the transducer across the entire target structure, or asymmetrically located pathologies (e.g., swollen synovium, effusion, erosion) may be missed.
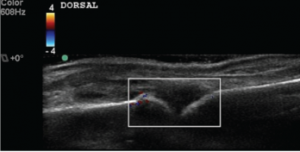
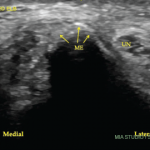
On our practical exam, only a minority of students performed thorough scanning through the target tissues, instead focusing on getting a perfect image in one plane (see Figure 1). This may have partially been due to time pressure, the grading scheme for the exam or the intimidating poker face of our exam proctors, but scanning through the entire region of the target tissue is, in any case, an important teaching point to emphasize.
Students of RhUS should learn to scan using light transducer pressure, except when pressing/compressing helps differentiate hypoechoic (low sound reflection/dark) or anechoic (no sound reflection/black) tissue from effusion. Although most students scan with light pressure, few routinely use more compression to help make this distinction. Some also assume that all anechoic tissue without Doppler signal indicates fluid collection, forgetting that hyaline cartilage, anisotropy (the artifact occurs when sound waves strike mirror-like reflective tissues, such as tendons at non-perpendicular angles and are reflected away from the transducer surface, resulting in an abnormally dark image), edematous synovium and machine setting imperfections all can result in tissue appearance similar to that of synovial fluid (anechoic) (see Figure 2).
Finger
Most students had not practiced scanning the first metacarpalphalangeal (MCP) joint, and so had difficulty with the volar/palmar views. Some students held the transducer perpendicular to the palm rather than perpendicular to the thumb (they should have aimed the beam directly at the longitudinal aspect of the thumb flexor tendons and the underlying bones rather than along the anatomic sagittal plane). Although we focus on MCP 2–4 in patients with inflammatory arthritis, and many ultrasound protocols skip the first MCP, this joint can certainly be involved, and the scanning technique needs to be slightly adjusted to account for the differences in anatomy, including the consistent presence of the two thumb sesamoid bones.
Most students did focus attention on the synovial recess, which extends proximally to the joint cleft. On the volar side of the MCP, the synovial recess is best visualized proximal to the palmar plate. Earlier in their training, many fellows made the mistake of assessing Doppler in the joint cleft but forgetting to include the proximal synovial reflection in the Doppler box (see Figure 3). By the time of the practical exam, our mentors gave all fellows a thumbs-up on this technique (sic, PD).
When performing a RhUS examination, it’s critical to sweep the transducer across the entire target structure, or asymmetrically located pathologies (e.g., swollen synovium, effusion, erosion) may be missed.
Wrist
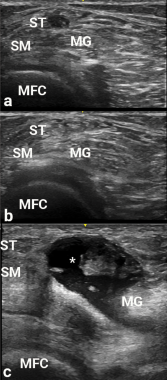
Figure 2
Images a, b and c are transverse
views of the medial popliteal space. Due to anisotropy, the semitendinosus area (adjacent to ST) is hypoechoic in appearance, and could be confused with a popliteal cyst. The ST become hyperechoic in b after transducer angle adjustment, thereby making the potential cyst disappear. In c, a real popliteal cyst (asterisk) is apparent between the semimembranosus (SM) and medial gastrocnemius (MG), and over the medial femoral condyle (MFC).
In obtaining the volar/palmar transverse view of the wrist, many found it challenging to visualize the median nerve without having the flexor tendons appear too dark due to anisotropy. Angling the probe/sound waves toward the elbow helps resolve this issue. This positioning requires a lot of nerve (sic, PD again).
Differentiating the extensor retinaculum from tenosynovium on the dorsum of the wrist presented an additional trial for some. The normal retinaculum should be a focus of attention in scanning healthy wrists for this reason.
The extensor carpi ulnaris (ECU) can be difficult to image without anisotropic artifact due to its serpiginous course. Radially deviating the wrist can help overcome this difficulty by straightening the ECU to minimize anisotropy.
Elbow
Although most participants found the elbow scan easier in general, some had difficulty identifying the lateral epicondyle and instead ended up scanning the humerus more proximally over the supracondylar ridge at the brachioradialis origin. Palpation of bony landmarks, such as the lateral epicondyle, can help the sonographer properly place the transducer on the target tissue—thus promoting serenity in tennis elbow evaluation—and should be emphasized by instructors.
Shoulder
The shoulder region has perhaps the greatest differences in depth between tissues of interest for various views. The acromioclavicular joint can be less than a centimeter deep to the skin, whereas the glenohumeral joint can be more than 4 cm deep. Thus, adjustment of depth, focal zones and frequency may all be needed when switching from one view to the next. Many students struggle to keep up with proper setting adjustments. Many also struggle to recognize tendon abnormalities despite scanning through the abnormalities. These students are focused on finding normal looking tissue and may assume that abnormalities are due to their technique rather than tissue pathology.
Hip
Although almost all students were able to properly identify the hip joint capsule, many adjusted their measurement of the capsule-to-femur distance to what they expected to find (i.e., a normal joint) rather than the full measurement, which happened to be particularly large in their healthy model. This was a repeated pattern throughout the practical exam: Students would first decide what they expected to see, then try to adjust the ultrasound image to fit their preconceived ideas rather than vice versa.
A few students forgot to examine the region with Doppler settings in planning a potential hip injection. The transverse branch of the lateral circumflex artery frequently lies in the path of the needle for a hip injection and should be identified.3
Finally, “toeing in” (applying more pressure with the distal edge of the transducer relative to proximal) can help visualize the hip capsule by reducing capsular anisotropy. However, the sonographer needs to be cognizant of the tissue pressure applied in employing this technique, especially in patients with substantial pannus over the inguinal crease, because atrophic skin can be injured by excessive transducer pressure.
Knee
Essentially all students were facile with the anterior view, but up to a fifth struggled to identify a Baker’s cyst on the posterior transverse view because they could not properly position the transducer on the three landmark structures: the medial femoral condyle, the semimembranosus tendon and the medial gastrocnemius muscle/tendon. Most of the students who struggled positioned the transducer too far distally. The medial femoral condyle is most easily distinguished from the proximal tibia by the thick layer of anechoic hyaline cartilage overlying the bone of the medial femoral condyle. Some students also erroneously identified anisotropic tendons as Baker’s cysts. See Figure 2 for the illumination of the disappearing Baker’s cyst.
Rocking the probe and sonopalpation (to assess compressibility) are two helpful techniques to avoid this pitfall.
Ankle
Half of the participants stumbled in visualizing the posterior tibial tendon (PTT) insertion. The course of the PTT in the ankle and foot is as follows: around the posterior portion of the medial malleolus, then on the cranial surface of the sustentaculum tali, then inferior to the calcaneo-
navicular (i.e., spring) ligament. Finally, as it gets to the navicular, about half of its fibers attach to the navicular tuberosity (infero-medial surface of the navicular) and the medial cuneiform. Some recurrent fibers connect to the sustentaculum tali, and the remaining fibers continue to the plantar surface of the foot. Due to this unusual course, when imaging the PTT in its longitudinal view in the medial foot, the sound beam must be angled slightly cephalad to minimize anisotropy.4
A few fellows misidentified calcaneal erosion as osteophytes due to failure to correlate longitudinal with transverse images and construct a three-dimensional image of the Achilles insertion in their minds. Erosions are potholes in the bone, and osteophytes are jagged extrusions from the bone. These two will be confused only if the sonographer cannot determine where the normal bone surface is, and this mistake could lead to substantial diagnostic and treatment errors (see Figure 1). At this moment, the student tends to feel like a heel (sic, you know who).
1st Metatarsalphalangeal Joint
The synovial reflection for the dorsal aspect of this joint is superficial and easily compressed by even light transducer pressure. Many students scan the first MTP without floating the transducer, a technique in which a thick layer of gel is maintained between the surface of the skin and the transducer face to minimize tissue pressure. The small effusion the model had was missed by the students who did not employ the floating technique.
The other difficulty for students included obtaining a longitudinal view of the plantar/volar metatarsal head due to shadowing from the sesamoid bones, and some resulting confusion of the sesamoid bones with the metatarsal head. The metatarsal head is deeper and has a layer of hyaline cartilage that the sesamoids do not. Often, the transducer frequency must be lowered for this view to penetrate the thick plantar soft tissues.
The Bottom Line
Despite a formal standardized training program, considerable variability in participant performance on written and practical examinations exists. We believe our final exam results not only evaluate competence, but also help fill in skill and knowledge gaps among the trainees and align their confidence to their competence. The ACR’s Musculoskeletal Ultrasound Certification in Rheumatology (RhMSUS) certification examination in musculoskeletal ultrasound also serves this important purpose: to let the practitioner know whether their ultrasound knowledge level meets acceptable standards. This is a very valuable service to the rheumatology community and our patients.
Although RhMSUS does not include a practical examination, there is a very high correlation between the participant scores on the written and practical portions of other examinations.5
The authors are all mentors for USSONAR, a society of rheumatologists, physicians and health professionals in North America working to promote the use of musculoskeletal ultrasonography to advance the care of patients with rheumatic diseases. For individual credentials, visit http://www.ussonar.org/about.
References
- Kissin EY, Niu J, Balint P, et al. Musculoskeletal ultrasound training and competency assessment program for rheumatology fellows. J Ultrasound Med. 2013 Oct;32(10):1735–1743.
- Torralba KD, Cannella AC, Kissin EY, et al. Musculoskeletal ultrasound instruction in adult rheumatology fellowship programs. Arthritis Care Res (Hoboken). 2017 Aug 4.
- Ward IM, Kissin E, Kaeley G, et al. Ultrasound features of the posterior tibialis tendon and peroneus brevis tendon entheses: Comparison study between healthy adults and those with inflammatory arthritis. Arthritis Care Res (Hoboken). 2017 Oct;69(10):1519–1525.
- Zhang M, Pessina MA, Higgs JB, Kissin EY. A vascular obstacle in ultrasound-guided hip joint injection. J Med Ultrasound. 2018 Apr–Jun;26(2):77–80.
- Kissin EY, Grayson PC, Cannella AC, et al. Musculoskeletal ultrasound objective structured clinical examination: An assessment of the test. Arthritis Care Res (Hoboken). 2014 Jan;66(1):2–6.
Authors’ Note
The views expressed in this presentation are those of the authors and do not reflect the official policy of the U.S. Air Force, Department of the Army, the Department of Defense or any other federal entity of the U.S. government.
